


One of the biggest challenges for many engineers and producers is getting the vocals properly balanced and placed in a mix. Keeping a vocalist's nuance and expression in place while making sure the performance gets the attention it deserves can be a major balancing act. In this article, we're going to show you how to use some powerful software tools to get professional vocal mixes in any type of production.
We'll be featuring iZotope's popular Nectar 3 Plus plug-in suite, which brings together essential tools and powerful AI that analyzes your tracks and provides an optimized starting point for your vocals. We'll also take a short side trip into their RX audio repair tools to show you how to cleanup some common issues with vocal tracks. Let's start off with a quick look at exactly what iZotope Nectar 3 Plus is and what's in it.
Table of Contents
Introduction to Nectar 3 Plus
What is Nectar 3 Plus?
Nectar Modules
The Cleaning Crew
Track Shapers
Using Nectar
Using Vocal Assistant
Getting More Hands-On With Nectar
Conclusion
Introduction to Nectar 3 Plus
Even the best vocalists and most carefully recorded tracks will need a certain amount of clean-up, whether it's simply gating out bleed from the singer's headphones, stifling some excess sibilance or removing breath noise from some passages. Once that tidying up is done, the challenge becomes getting the vocal properly placed in the mix and having the right effects applied in a way that complements, rather than distracts, from the performance. In a traditional, old-school recording studio, this requires a couple of racks of specialized outboard gear. The modern DAW and powerful plug-ins have totally changed that process thanks to packages like iZotope's Nectar 3 Plus.
What is Nectar 3 Plus?
iZotope's Nectar 3 Plus brings together the tools that are essential for the process of creating a great vocal mix, and combines them with some remarkably effective artificial intelligence to produce a custom vocal chain for any style of voice or performance. Before we get to how to use this plug-in suite, let's cover the individual modules that are included, and a little bit about what they do.
Nectar Modules
For the purpose of this intro, we'll be dividing Nectar 3 Plus' modules into two basic categories. The first comprises the modules used to clean up a track and make it ready for the mix process. The second is made up of the ones that shape and add effects of various sorts to the mix. Since these are the building blocks that you'll use to sculpt a vocal track, let's take a deeper dive into just what it is they do.
The Cleaning Crew
No vocal track that we've ever encountered is perfect. There are always issues, from small to large, that will need a little touch up or tweak, from one or two flat notes to bleed from the headphone mix the vocalist was using. The following are the modules Nectar 3 Plus has to tidy up a track before you start mixing.
Pitch
Nectar 3 Plus' Pitch module is designed to provide general overall pitch correction on a track, not as an effect. It's always placed first in the vocal chain and cannot be moved, though it can be turned off if you don't need or want it. Basic controls allow you to set a specific key or scale to correct to, allow Nectar to auto-detect the scale, set to a chromatic scale or custom design a tuning standard. You can also select high-, mid- or low-vocal registers to make the correction more easily match the vocal range of the performer.

Once pitch correction is enabled, there are controls to set the strength of correction (how strongly it moves any notes that are off-pitch to the correct note) and speed of correction (how quickly it moves the note). Use these controls to fine-tune performance. For example, if a singer has a strong vibrato, too strong or too fast correction will start to make the voice sound unnatural, so you may want to roll back the strength and/or speed in that case. If you need to make more radical changes to a vocal performance, Nectar 3 Plus includes a license for Celemony's Melodyne 5 Essential, which goes beyond pitch correction to things like the ability to retune notes to entirely new pitches and change phrasing.
De-Esser
The De-esser module in Nectar is designed to strip excess sibilance (a phrase that might cause this exact problem) from your track. You can think of Nectar's De-esser as a specialized compressor that looks for sibilance and reduces the volume of the overall signal in response to certain types of high-frequency energy. This is what's known as wide-band de-essing. There are other de-essers, like the one in iZotope's RX 9 audio repair plug-in, known as split-band de-essers. These divide the full frequency range into multiple sub-bands and only change the level on the frequency band where the problem lies. That's an equally effective approach, but it can tend to have a more profound effect of the overall tonality of the voice when it kicks in, sometimes requiring extra EQ to compensate.

Controls here are easy—a frequency control and a threshold control. Frequency sets the bottom edge of the sibilant frequency range you need to deal with, and threshold sets how loud that frequency range needs to get before it starts being reduced. One nice feature of the Nectar De-esser is the Listen control, which gives you isolated playback of just the sibilance frequencies that are being affected, so you can fine-tune the frequency range and the threshold to process only problem sections.
Gate
The Gate module in Nectar 3 Plus is great for cleaning up vocal tracks where there is excessive bleed from live instruments or from a vocalist's headphones. Controls, as with most gates, are simple. Open and Close threshold controls set the levels where the gate will open up and where it will close. Having these controls separate helps avoid the problem of gate "chatter," which occurs when a signal hovers too closely to a single threshold. Setting the Close control a small amount below the Open control will kill any potential chatter. Attack controls how quickly the gate opens, while Release sets how quickly it closes. The remaining control, Ratio, sets how much the gain is reduced when the gate closes, so you can leave a ghost of the background in, if you need to.

Breath Control
If you've ever recorded spoken word material, like audio book narration, you know what a chore getting rid of unwanted breath noise can be. The Breath Control plug-in included with Nectar 3 Plus is borrowed from iZotope's RX plug-in package and provides a powerful tool for reducing or removing breath noise from spoken or sung vocal tracks.

Breath Control targets the harmonic structure of breath sounds. It has two operational modes, Gain and Target. Gain mode simply reduces the gain of all identified breath sounds by a set amount. Target mode is more dynamic, leaving softer breaths relatively untouched and reducing louder breath sounds, for a more natural-sounding end product. A Sensitivity control sets detection levels for breath sounds. A Breath Only mode outputs only the detected breath sounds to help you fine-tune the sensitivity of the breath detection.
Track Shapers
After you've gotten your tracks appropriately cleaned up, you get to the fun part—shaping the track and making it ready for your final mix. iZotope Nectar 3 Plus has seven modules available to do that shaping. Here's a brief overview of the tools at your disposal.
Compressor
A good compressor is one of the most essential tools in recording, no matter what type of track you're working with. For vocals, the primary use of compression is to ensure dynamic consistency, so that the vocal will maintain a steady relation to the rest of a mix. A secondary use will be to achieve any desired tonal coloration. This is one reason why Nectar 3 Plus has two compressor modules available in its signal chain. Use the first for general dynamic leveling, then use the second, usually after the EQ stage, for fine-tuning of dynamics and for subtle (or not so) coloration.

The Compressor mode of Nectar 3 Plus is extraordinarily versatile—almost a one-stop compressor shop. You have two compressor modules available in each iteration of the plug-in, which makes running chained compressors for more subtle dynamics control a possibility. Each compressor module has four available modes: Digital, for surgical precision with minimal tonal coloration; Vintage, for the non-linear release curve and program-dependent response of the classic units that forged the sound of popular music during the 1950s and '60s; Opto, for the smooth, subtly colored sound of optical compressors like the venerable Teletronix LA-2A; and Solid-State, for the aggressive compression and more obvious tonal coloration of vintage VCA compressors like those found in various Rupert Neve designs, SSL channel strips and the venerable API compressor.
Nectar's compressor modules provide a choice of Peak or RMS level detection, with recommendations for which one will work best with each particular sub-mode (e.g. RMS generally works better with Opto and Peak with Solid-State modes). The rest of the controls are largely what you'd normally get with most every compressor—Threshold, Ratio, Attack, Release and Make-up Gain. An exception is that the Opto mode has a fixed 4.0:1 compression ratio. There's also an Auto-Gain switch where Nectar's AI works to match your input level to the output level, so you don't have to spend time tweaking that Make-Up gain slider. Monitoring compression is done with the usual gain reduction meter or (and this is a monitoring mode we love) with a representation that shows the original, uncompressed waveform in the background with the compressed waveform in the foreground for a quick and easy visual comparison.
Pro Tip: Spending some time automating the Gain plug-in as the first stop on the vocal track channel strip in your DAW will make it easier to use subtler settings on the compressors, and will make for less fader riding or automation of channel volume later in the mix stage.
EQ
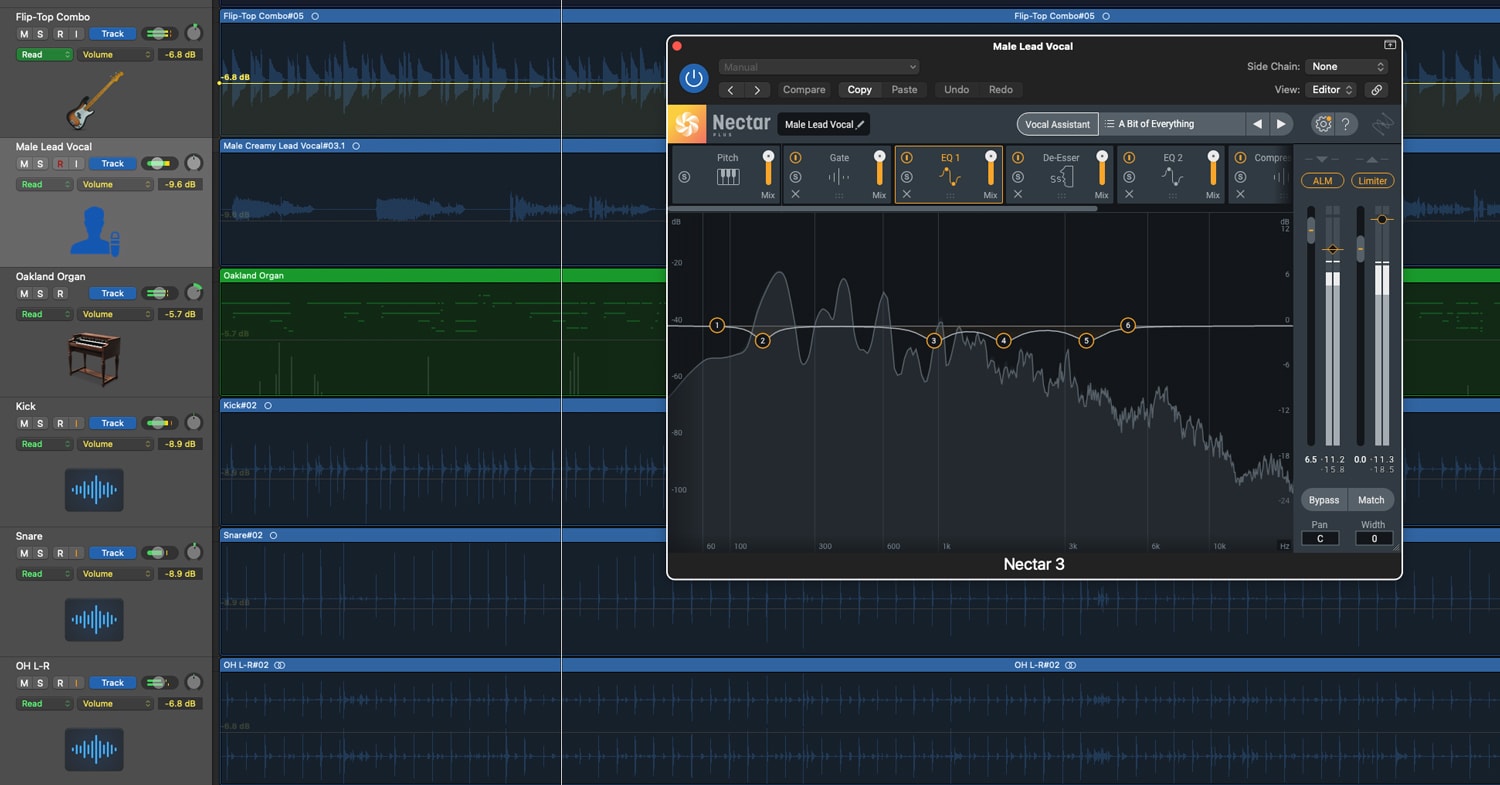
Nectar 3 Plus has an exceptionally powerful EQ module. Each iteration of the plug-in can have two EQ modules active, each with up to 24 bands, each of which has adjustable filter types and shapes. We've seen stand-alone EQ plug-ins that don't have all the features you'll find in this single module. With two EQ modules available, the most common use will be to apply the first EQ after initial compression to contour the overall vocal tone for the singer and track, then use the second at the end of the vocal chain after other processing (delay, reverb, saturation, etc.) to ensure that you (and the artist) are getting exactly the vocal tonality desired for the song.

For all the power it carries, it's very easy to use, thanks to the well-designed visual interface. You add a band by several modes, with double-clicking where in the frequency range you want it and dragging into place the easiest. Each band can be set to a frequency by clicking and dragging, double-clicking on the frequency value and directly entering a value or using the arrow keys to change it. Each band can be individually soloed, so you can check that you've got exactly the right frequency chosen. The exact same techniques apply to setting the Gain for each EQ node. The Bandwidth control sets the EQ or the slope (dB/octave) of a node using the same types of control to widen or narrow a band or rate of slope.
iZotope has provided three different filter types—Peak, Pass and Shelf—each of which has multiple filter shapes. The basic high-pass and low-pass filters can have flat or resonant shapes.
Shelf filters have four shape options—Analog, which is a smooth, simple curve; Resonant, which adds a slight complimentary resonance bump at each end of the slope; Vintage, based on the legendary Pultec analog EQ; and a Baxandall curve, which is a longer, gentler slope that some feel provides a more natural sound.
Peak filter types have four variations. First is a basic Bell curve. Second, a Proportional Q where the more cut or boost that's used causes the peak of the curve to get narrower and narrower for exquisitely fine control of the extremes. Third, a Vintage curve that is essentially an asymmetrical bell shape—narrower when you cut the frequency and wider when you boost it. Finally, the Band Shelf, which takes the basic bell curve and gives it a wider, flatter top to give control over a broader range of frequencies with a single EQ node.
One of the most powerful tools in Nectar 3 Plus' EQ module is the ability to make the EQ nodes dynamic, changing with the frequency content of the input. Putting a node into Dynamic mode enables you to vary either the gain or the frequency center (but not both at the same time) of an EQ node, depending on the strength of the input signal. Dynamic Gain mode can act like a frequency-specific compressor or expander by setting the associated Threshold control and then choosing cut or boost values. One use of this is as a replacement or supplementary de-esser in situations where you need extra processing over what the de-essing module provides.
Dynamic Frequency EQ will track with the fundamental or harmonic frequency that is closest to its initial setting, following along, as it were. This can be used to totally recontour a vocal or to reduce an unwanted resonance in a particular part of a singer's range.
Saturation
Saturation, the polite term for distortion, can help pop a vocal track out in a mix without having to increase its level. It adds thickness and warmth to a vocal, with the added benefit of helping control transients as a side effect of the soft (or sometimes not-so-soft) clipping that's an integral part of the effect.

iZotope has supplied Nectar 3 Plus with a versatile module that can go from subtle to extreme, as your needs and the track require. This module offers up seven different types of saturation:
- Analog—This is an emulation of solid-state/transistor saturation that emphasizes odd harmonics. Fairly mild, but gritty results.
- Retro—A more aggressive distortion that's also based on transistors that are being pushed hard. Edgier and sharper, also with a predominance of odd harmonics.
- Tape—The sound of putting too much signal on magnetic recording tape. This also emphasizes the odd harmonics, but has a different, shorter harmonic slope, which results in a softer-sounding effect compared to the solid-state variants.
- Tube—An emulation of glowing glass bottles reaching their limits, i.e. vacuum tubes being driven. A popular type of saturation that mixes odd and even harmonics.
- Warm—With an accent on even harmonics and a relatively steep harmonic slope, this one is fairly subtle warmth.
- Decimate—Reducing the sample rate causes digital aliasing which adds distortion artifacts that can be interesting and odd. Sometimes, that's just what you need.
- Distort—It's aggressive. It's angry. It can get brutal. Think of it as a fuzz tone for your vocal tracks.
The key added control here is the Post-Filter‚ a low-pass filter designed to remove the type of high-frequency "fizz" that often accompanies saturation and distortion.
Delay
Delay, echo, however you want to repeat yourself, it's one of the most widely used effects on any track. Having presets that are designed for the unique application of vocal use is a huge advantage. From slight thickening to rockabilly-style slapback to full-blown multiple-repeat psychedelic madness, Nectar 3 Plus' powerful Delay module provides five different modes to suit any genre or recording style.

- Digital—This exceedingly transparent delay will provide an exact copy of the original signal and minimal coloration.
- Tape—Filters and distorts each progressive repeat in the style of a magnetic tape loop for a classic vibe.
- Analog—This gritty delay is based on the sound of overdriven transistors for a bit more of an edge.
- Grunge—Add some crunchy drive after the feedback control for a spiky edge to the delay repeats.
- Echo—Where the Tape mode gets dark as it decays, this one adds presence to succeeding repeats for a kind of "thinning out" effect.
Beyond the delay types, there are a full set of the traditional delay controls—Mix, Feedback, Tempo Sync or manual Delay time, Modulation Rate and Depth controls, plus a control for the amount of saturation in the repeats.
Reverb
iZotope based the vocal reverb in Nectar 3 Plus on one of the most widely used studio vocal reverbs, the classic EMT 140ST Stereo Plate Reverb. A 500-pound, 4'x8' behemoth, the original EMT stepped beyond the "sproing" of the Hammond spring reverb to become the first mechanical reverb that delivered a sound close to the custom-built, room-sized echo chambers of large recording studios, while offering tighter control of the reverb sound than those rooms ever could. The signature sound of the EMT was very much the reverb sound of the pop and rock recordings of the '60s.

In addition to the basic Reverb (a mix control knob), they've added a dedicated Pre-Delay control to substitute for the studio workarounds that were traditionally used to provide a little pre-delay to the EMT, and a Width control for use when the module is in stereo mode.
Pro Tip: You can tighten up even a fairly wet reverb by adjusting the pre-delay time to match an appropriate rhythmic sub-division of the track's tempo. Usually this will be a 64th or 32nd note value. For example, at 120 BPM, these values would be 31 or 62 ms, respectively. There are charts available that break down time values for different notes at different tempos, which is much easier than breaking out the calculator every time you're setting up the reverb.
Dimension
When iZotope named this module Dimension, they're referring to the sometimes 3D textures that various types of modulation effects (Chorus, Flanger, Phaser) can add to a track. In Nectar 3 Plus, the Dimension module provides flexible controls, some of which shift their function depending on whether the effect is time-based (Chorus and Flanger) or frequency-based (Phaser).

For example, Depth controls the changes in delay time in Chorus and Flanger modes, but the number of filter nodes in Phaser. Rate changes how quickly the sweep either changes delay value or filter nodes. The Rate control can also be synced to song tempo. The effects share a Width control to change the size of the stereo image. One control, Frequency, is for the Phaser only, and sets the start frequency for the filter sweep.
Modulation is an effect to be cautious with when applying to vocals. A little can thicken up a vocal nicely, but too much can start to smear both the intelligibility and the stereo placement. This is a place where your ears and experience will come into play. These effects are most generally used on specific sections of a song where you want the additional texture to make the vocal stand out, rather than on an entire track.
Harmony
The final module we're looking at is Harmony, arguably the most complex of everything iZotope built into Nectar 3 Plus. Considering that this module can add up to eight harmony voices to your vocal track, with the capability of being controlled via MIDI, it's little wonder that there's a whole lot to explore here. For the purposes of this article, we'll just be touching on the basics.

Global controls for the Harmony module are Set Scale, which, along with the Vocal Register control, are shared with Nectar 3 Plus' Pitch module (see above), and a Voices Only mode, which lets you hear just the output of the processed harmonies.
Individual Voice controls determine Pitch Correction, Time Variation and Pitch Variation for each assigned voice, to humanize the results because perfection is boring. There are also a pair of shelving filters for EQing the harmony output.
Turn on MIDI Mode and you can directly control the pitches of assigned harmony voice from a MIDI controller or (and this is a cool feature) from an existing MIDI track in the song on your DAW. Incoming MIDI notes are assigned to the lowest available voice node number (i.e., play a note on the MIDI controller, and harmony voice 1 will use that pitch. Play a second note while voice 1 is still being played, and it will trigger voice 2, and so on). Release the note that triggered voice 1, and it will take the next input note. MIDI mode assigned to existing MIDI tracks enables the creation of more complex harmonies that aren't simply parallel diatonic voicings.
The Harmony module's Voice XY Pad Controller is one of the neatest ways we've seen of dealing with the imaging and mixing of generated harmonies. Just drag a voice to where you want it in the stereo image and move it up (or down) to change its level in the mix. Simple and easy to do with a nice visualization of your entire vocal mix.
Using Nectar
Now that you know what's in there, let’s talk about what really sets Nectar 3 Plus apart—the custom AI that iZotope has developed to listen to your track and make suggestions about what the vocal track needs. This is what's called Vocal Assistant.

Using Vocal Assistant
Vocal Assistant is the first contact point with Nectar 3 Plus and jumping-off place for optimizing your vocal mix. When you first open an iteration of Nectar, you'll have the opportunity to choose Assist, Unmask or both. While you'll frequently select both with your first start, we're going to look at them one at a time.
Using Assist
When you've chosen Assist and clicked on the Next button at the bottom of the plug-in screen, the first thing that Nectar 3 Plus will ask you to do is select what Vibe (Vintage/Modern/Dialogue) you want for the track and to choose the intensity (Light/Moderate/Aggressive) of processing you want to use. Once you've made those selections, it will ask you to start playing audio, so it can analyze the vocal track and provide suggestions for the initial settings. Assist needs at least 30 seconds of audio to analyze, so if the clip you're analyzing is shorter than that, you'll need to set it up to play in a loop. Once Assist has done its analysis, it will load up the AI's suggestions for optimizing your vocal track and ask you to approve. If you like the results, you could simply stop there and accept the AI's recommendations. But we'll get to that after we've talked about using the other side of Nectar—Unmask.
Using Unmask
Unmask analyzes how and where other tracks might be getting in the way of the vocal, and applies an EQ curve to the track that's masking the vocal to get it out of the way. Using Unmask requires that an iteration of either iZotope Nectar, Relay or Neutron be placed in the track, so that Nectar 3 Plus can communicate with it and make changes. The Plus version of Nectar 3 also adds some advanced options to Unmask.
When you select Unmask, you'll need to choose what track you want to analyze for masking. Generally, this will be a track that's in the same frequency range—something like keys or guitars that live in the same range as the human voice. Make sure that an iteration of Nectar, Relay or Neutron is placed in the last plug-in slot of that track and activated, select that track from the flip-down menu and click the Next button. Nectar will ask you to start playing audio and do the analysis. As with Assist, you'll need at least 30 seconds of audio for the analysis. Once the AI has finished its analysis, it will ask you to accept the suggestion. As with Assist, if what Unmask did is working for you, you can just leave it as it is and get solid results.
Unmask will only communicate with one other compatible plug-in at a time, and it's likely you may have more than one track that could be masking the vocal track. Assign those tracks to a stereo bus, and place the plug-in that communicates with Unmask on that bus, and use that bus to process all the masking tracks at once.
Note that, with Nectar 3 Plus, you can choose a dynamic EQ for Unmask which will only change the EQ of the masking track in the places where it needs to get out of the way for the vocal.
Now, about that “leave it as it is" thing.
Getting More Hands-On With Nectar
Nectar 3 Plus' AI algorithms are excellent. and the results of its analysis have been, in all the work that we've done with it, solid choices, but, as with everything in the mixing process, there's always room for little tweaks to make it that much better. The best approach, we think, is to use the results from Vocal Assistant and Unmask as suggestions for starting points, rather than as the final solution.
Unless your vocalist is a one-take wonder, you will first want to create a comp track that brings together the best parts of various takes, using your DAW's gain tools to create a master vocal track that's all level-matched to minimize the need to ride the vocal fader later in the mix process. Then you can start playing.
Here are a couple examples of what we're talking about. First, let's talk about pitch correction. On a certain level, the less pitch correction you have to do, the more natural the vocal will sound. Unless you're looking for that specific robot-vocal effect, if your singer can get a little more in tune, that should be a good thing. If the track you've got is a little too pitchy for your taste, by all means, use the Pitch function, but bounce a pitch-corrected track for the singer to practice with for a day or two, and you're likely to get a new track that needs far less correction.
Another example is EQ on a track. While it's one of the most important tools for shaping your sound, too much EQ, especially when it's additive (increasing the gain of frequencies) rather than subtractive (decreasing the gain of frequencies) can start to cause potential phase issues. Think of EQ as a fine chisel that reveals fine details and makes space in the mix, rather than a sledgehammer. Use tools like Harmony and Dimension carefully, to thicken and add texture to a vocal, but subtly enough so as not to overwhelm the performance.
The more time you spend examining just what changes Nectar makes and how it makes them, the more your ear will begin to hear how those tiny changes can affect your mix. Then, you can start applying those lessons to other, non-vocal tracks to create a unique space for every track that will result in the final mix of all tracks having more impact and resonance for the listener.
By the way, even though it's intended for vocal tracks, Nectar 3 Plus is a great solution for something like an instrumental solo track. If you think about it, most solo instruments are, in effect, taking the place of the human voice in a mix, so there's no reason you can't enhance them in the same way.
Conclusion
Mixing is as much art as science, and it's good to know both the physics behind how sound works and how the emotional impact of how a particular blend of voices and instruments can transport your audience. iZotope has created a powerful tool in Nectar 3 Plus that uses the science of artificial intelligence to make it easier for you to keep your eye (and ear) on the part of music that engages, involves and moves us all. Experiment. Don't be afraid to make a mistake and do it again. And, above all, listen to what your ears tell you.